Steps To Install LVP On Stairs

Aesthetic LVP on stairs installed at a residential space.

Share This Post

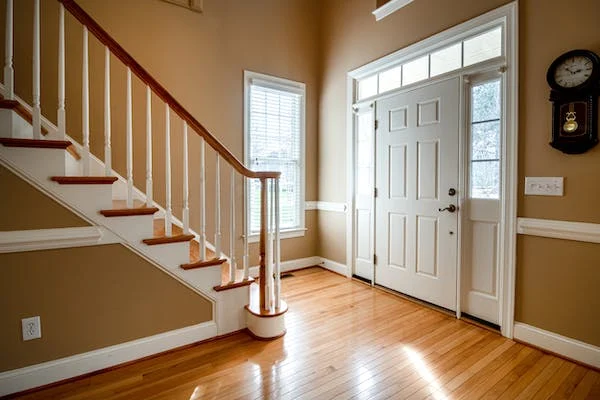
What is the first thing that you notice while entering a house? Your gaze would hunt down the focal point of the house. It would probably be the ascending pathway connecting the house’s different floors. Yes, you guessed it right! We are referring to the stairs. These architectural marvels are more than mere connectors; they are silent storytellers as they whisper the memories made in the living space.

However, opting for the right flooring material is necessary to achieve visually appealing staircases. LVP on stairs is an excellent choice if you want an aesthetic and durable solution simultaneously for your staircase. Luxury vinyl plank on stairs is a perfect option as it’s affordable, long-lasting, simple to install, clean and maintain and goes easy on the eyes.


But the question arises of how to install vinyl plank flooring on the stairs. Installing vinyl on stairs may seem challenging initially, but following the proper steps can make this process fast and flawless. We are here with this guide to teach you how to install a visually appealing LVP on stairs. And what’s better when you have installed LVP on stairs?

Let’s dive in.

Tools And Materials Needed To Install LVP On Stairs

Before you start laying vinyl plank flooring on your stairs, arranging all the materials and tools required to install luxury vinyl on stairs is necessary. Let’s have a look at them.

  • Luxury vinyl planks
  • Adhesive or vinyl glue
  • Stair nosing
  • Stair risers
  • Pencil
  • Nails and screws
  • Hammer
  • Eye protection
  • Sharp knives, blades, and a table saw
  • Vinyl glue
  • Measuring tape
  • Carpenter Square
  • Drilling or nail gun
  • Level
  • Floor roller
  • Stair tread gauge
  • Cleaning supplies
Luxury vinyl plank flooring on stairs connecting one house floor with the other.

How To Step By Step Install LVP On Stairs?

Installing vinyl plank flooring on stairs is a great idea, as it coordinates with the rest of your flooring, gives your living space a contemporary style and dazzles up the entire living room. Moreover, staircases are heavy-traffic areas which demand a strong and durable flooring option, and what’s better than luxury vinyl plank flooring stairs when it comes to rigidness and longevity? Therefore, to ensure you get well-fitted and attractive vinyl plank flooring for stairs, we will discuss its various installation steps in
detail below. Let’s jump into it.

Step 1: Prepare Your Stairs

The first step to installing LVP on stairs is preparing the subfloor. Remove any previous flooring, glue or residual material installed. After removing the existing flooring, thoroughly clean and sand the floor. This way, you can also get a chance to fill any holes or cracks and remove screws or nails to get an even surface.

Pro Tip: Remember to sand your risers too. Although you don’t walk on the risers, sanding them will give you a smooth and flawless staircase after installing your vinyl flooring stairs.

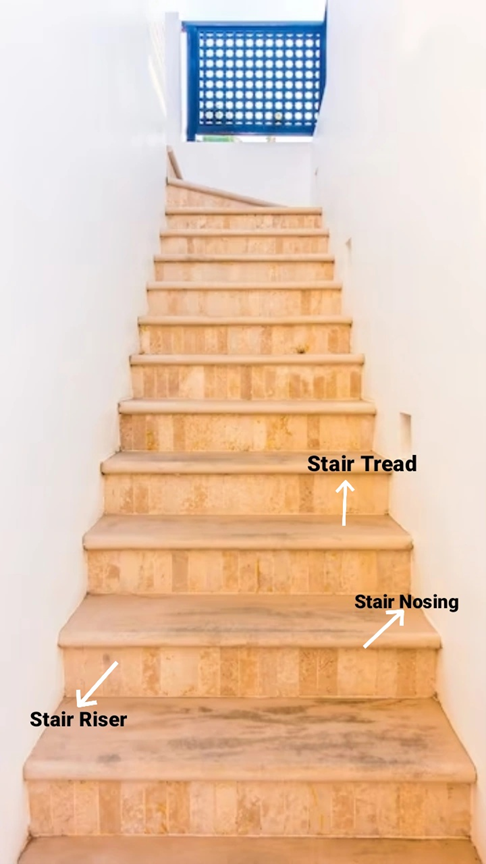
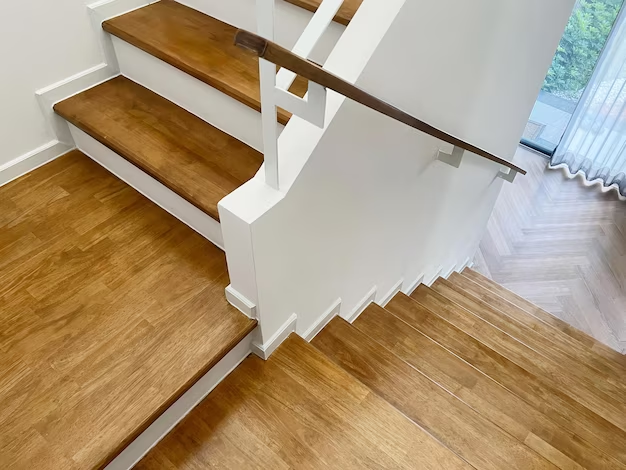
Step 2: Understand Stair Tread, Risers And Nosing

  1. Stair Tread Vinyl plank stair treads are the horizontal part of the staircase where you place your foot while climbing up or down the stairs. This essential surface supports your foot so you can ascend or descend easily. Stair treads not only provide a great structure but also ensure a safe walking surface.
  2. Stair Riser The riser is the vertical part of the stairs that stands between two treads. In simpler terms, the riser separates one tread from another so you can step up or down the staircase.
  3. Stair Nosing The stair nosing is a small piece at the front edge of a stair trend. This minor piece enhances the visual appearance and increases functionality and safety. Additionally, the stair offers excellent finishing, improving the aesthetics of the staircase.
An LVP stair labelled with essential parts.

Step 3: Measure Top Tread

Always measure the first tread as you install LVP on stairs from top to bottom. This is necessary because once you have installed vinyl flooring on the first step, you must let its glue dry before standing on it.

To accurately measure the stair tread, start by calculating the width of the stair nosing. After measuring its width, mark the spot on the tread where the nosing ends. After this, measure the tread from the mark to the back edge. This way, you will get your LVP stair tread width.

Step 4: Measure The Top Riser

The riser is relatively easy to measure. All you need to do is place a spare vinyl stair plank on the bottom tread. Then measure the riser from the bottom tread to the top tread. This will be the length of the riser.

Step 5: Cut The Tread, Riser And Nosing For The First Step

It’s time to cut the tread, riser and nosing for the first step to lay LVP on stairs. This can be a tricky step, so be careful. Always go for a utility knife or a table saw with a fine-toothed blade, as a cutter only cuts from 12″ to 20″, which is insufficient to make the lengthwise cut.

Your tread might need more than one plank per step, so place a spare piece as a guide to cut the length of the other pieces. This way, you can save time and effort.

Use a long, straight-edge tool like a level to cut the tread. Then mark the length and width of the stair tread on the luxury vinyl plank for the stairs. Now place the vinyl plank on a straight and hard cutting surface. Place your saw or utility knife on the marked lines, apply adequate pressure and cut downwards to snap out a nicely cut LVP stair tread.

Now it’s time to cut the riser for the first LVP stair step. Pick another plank and follow the same process, but the length and width measurements will be different to cut the riser. Make the measurements and cut the riser plank on the marked lines to get an accurate piece.


Finally, it’s time to cut the stair-nosing. It’s best to use a fine-toothed hacksaw to get the perfect nosing. Place the nosing piece on the cutting table so that there is a firm grip to get a precise cut. Make a 90-degree cut by slowly cutting the nosing on the marked lines.

Step 6: Fit Check Your Tread, Riser And Nosing

Check the LVP stair tread, riser and nosing size by placing it on the first step. First, place your tread, then the riser and then your nosing over the riser. Ensure the riser is tucked at an accurate angle against the tread and the riser. If the nosing is protruding unusually, you need to trim the width of the tread.


If the stair nosing doesn’t tuck properly against the riser and tread, the nosing will fall and create a safety risk. Therefore, it is necessary to carefully tuck the nosing over the riser and against the tread. It is best to measure all the vinyl stair steps, cut the pieces and rough-check them before glueing them.

Additionally, sandpaper any rough edges and clean any debris attached to the planks so that it’s ready for installation.

An LVP stair right in front of the entrance.

Step 7: Start Gluing And Installing The Tread, Riser, And Nosing

It’s time to install LVP on stairs by glueing all the pieces in their relevant places. There are two types of glues. One is applied on the subfloor, while the other is applied at the back of the LVP for stairs. You should follow the manufacturer’s guidelines and use the glue accordingly.


Making an S pattern is a great way to apply the glue evenly on the plank. Fill the spaces left and gently place the plank in the relevant place. Use a roller or flat your hand to ensure the plank’s smooth placement. Clean off any extra glue to give it a finished look.


Always remember first to install the tread, then the riser on top of it and then the nosing in the last on the riser and against the tread.


Moreover, many luxury vinyl plank flooring is self-adhesive. All you need to do is remove the back sheet and place the plank in the desired place to stick the plank. However, it would help if you still used additional glue for strong and durable vinyl flooring placement of stairs.

Step 8: Continue This Process Until The Entire Vinyl Floor Staircase

Keep repeating the glueing process until you reach the end of the staircase. Don’t forget to let the stairs rest for 4-6 hours until you start walking on them.


Moreover, follow the manufacturer’s instructions on the planks and adhesive to get an idea of how long the glue needs to stick and harden.

Additional Tips To Install LVP On Stairs

Although installing vinyl plank on stairs is pretty easy, there are still some additional tips and tricks which you can follow to make the process quick and hassle-free. Let’s have a look at them:

  • Use a vinyl cutter while installing LVP on stairs, as it is specially designed to cut vinyl planks. It is
  • easily available, affordable and can be bought on rent too. The vinyl cutter cuts fast and better.
  • Remember not to leave any space between the riser and the nosing, as it can create a
  • dangerous staircase, resulting in safety hazards.
  • Always rough-check pieces before glueing them to ensure they are cut in the right length and
  • width.
  • It’s great to always measure all the vinyl stair steps as each one of them can have different
  • dimensions, which may need luxury vinyl planks of different sizes.
  • It’s best to use a stair gauge for structural support if you need to uniform stairs or install LVP in
  • an old house staircase,
  • Use sandpaper to even the rough sides of treads and risers. You should also sand the inner side
  • of the nosing. This will improve the glueing and ensure durability.
  • If you find the LVP on stairs process difficult, you can install single pieces of plank stair cover.
  • They have attached tread and nosing. All you have to do is place the plank on every step to
  • create beautiful vinyl stairs.
A beautiful landing vinyl plank stairs in a house.

LVP On Stairs Maintenance

You might think installing vinyl plank on stairs is a good option as vinyl stairs add aesthetic value, increase longevity, and are a rigid solution for high-traffic areas. This is true, but it is only possible if you maintain the vinyl staircase thoroughly.


Hence, here are some maintenance tips to keep your vinyl floor long-lasting.

  • Regularly vacuum the LVP on the stairs to pick up any garbage and trash.
  • Sweep your vinyl staircase every day to wipe off the dirt.
  • Vinyl flooring is waterproof, so you can also wet and steam mop the staircase for deep cleaning.
  • Avoid harsh detergents and chemicals on your staircase, as they can damage the material.
  • Combine baking soda and water to create a paste for stubborn stain removal for your vinyl
  • stairs.
  • Avoid dragging sharp objects on your stairs, as they can crack, scratch and puncture the vinyl
  • planks.
  • Some vinyl staircases have a protective topcoat that can benefit from occasional waxing. Use a
  • vinyl-specific wax and follow the manufacturer’s instructions for application.
  • Although vinyl is water resistant, avoid moisture as it can seep into the edges and seems to
  • damage the planks in the long run.
  • Conduct regular inspections to spot signs of wear and tear so that you can address these issues
  • promptly before they worsen.
  • If you have furniture or items on the staircase, consider placing protective pads or felt
  • underneath them to prevent scratches or damage to the vinyl surface.

Bottom Line

LVP on stairs is a great solution if you are looking for visually attractive, space-defining, rigid, robust, durable and long-lasting flooring for your stairs. However, this can only be achieved if you find the right luxury vinyl plank for stairs and follow the installation steps correctly. Moreover, its aftercare and maintenance are equally important to preserve the vinyl staircase’s beauty and longevity.

Frequently Asked Questions (FAQs)

Here are some frequently asked questions about installing vinyl plank on stairs.

Can you install LVP on the stairs?

Yes, you can install LVP on the stairs. In fact, it does not only add aesthetics to your living space, but it is also easy to install, clean and maintain. Moreover, installing vinyl planks on stairs is an affordable and durable idea.

Is luxury vinyl plank slippery on stairs?

No, luxury vinyl plank flooring on staircases does not create a slippery surface. Vinyl’s resin coating and texture’s surface make it anti-slippery, giving a firm rubber-like texture.

Is LVP on stairs cheaper than carpet?

Yes, LVP on stairs is a cheaper flooring option than carpet. You can easily find vinyl planks for $3-$5 per square foot, while carpets cost around $5-$10 per square foot.

What is stair nosing?

The stair nosing is the long narrow piece on the stair step that protrudes outwards from the tread. This minor piece plays offers finishing to every vinyl stair step and also adds visual appeal to the stairs. It also offers structural support so that you can easily climb up and down the stairs, reducing the risk of accidents.

How do you install stair nosing?

Start by measuring the length and width of the nosing to mark the calculations on a fresh vinyl plank. Take a fine-toothed saw and cut it on the marked lines to get your vinyl plank stair nosing. After glueing the tread and the riser, place the nosing on the riser and against the tread to get a perfect angle. Make sure to tuck carefully tuck the nosing on the riser and against the tread.

Subscribe To Our Newsletter

Get updates and learn from the best

More To Explore

A number of vinyl plank flooring colors
Blog

Top 5 Vinyl Plank Flooring Colors to go for

What’s the first thing you notice when you step into a room? We bet it’s the floor. That’s because it’s the first thing our eyes naturally land on. The floor makes a big impression the moment we step into the room, so it’s super important to choose the right wood, carpet, tile, marble, or vinyl plank flooring colors. No matter which material your floor is made of, choosing the appropriate colour is essential as it contributes to the overall style, theme, and mood of the space. A light-colored floor creates an open, airy space, while a dark one evokes warmth and intimacy. Therefore, pick a color according to your room’s setting and preference. In this blog, we will uncover some of the most trending vinyl plank flooring colors, as this is the most common type of flooring. Let’s get started. Trending Vinyl Plank Flooring Colors Several luxury vinyl plank flooring colors are available, and you can choose according to your room or space’s requirements and setting. Let’s look at some of the most popular vinyl plank flooring colors. Grey Grey is one of the most trendy vinyl plank flooring colors, as it gives a natural look to any installed space. This minimalistic tone makes the room appear big and spacious as it goes easy on the eyes. This neutral color is a perfect choice for floors as they are more versatile and enable the walls to carry the room’s weight. Grey vinyl flooring is a sophisticated and stylish option, giving a modern and aesthetic touch to your homes and commercial properties. This shade also works well with various interior designs, as grey is no less than a blank slate for decorating. Grey comes under a dull tone, making other bright colors in the room pop very well.  Moreover, grey vinyl flooring is great for hiding dirt, dust and pet hair. This natural achromatic color is also good at hiding scratches and scrapes, which is why this flooring is a good option if you have heavy furniture or like making frequent décor changes. Grey is one of the vinyl plank flooring colors, which is an appropriate option for rental houses. Those properties are roughly used, and different people move in them where they set the space according to their unique preferences. Additionally, it’s a good idea to always go for natural colors as this increases the house’s value, which can then be resold at any time. Brown Brown-colored vinyl flooring is the most common option across various houses, shops, and properties. Most shades and tones of vinyl planks are usually available in this color. From strong mahogany tones to pale tans, brown vinyl plank flooring comes in various shades, which you can choose according to your setting. Brown vinyl plank flooring comes in several patterns, which makes it easy to pick a type that compliments the existing room furniture and décor. Brown comes under the prime vinyl plank flooring colors, which offers amazing versatility as its tones offer depth and richness without looking heavy or extra. This flooring color looks natural as it resembles hardwood, which gives a cozy and warm feeling. Moreover, brown vinyl flooring is available in various patterns like embossing, zigzag, geometric shapes, knots, cracks, and grain variations. The best colors for your residential or commercial spaces are those that depict a natural tone, like sand or tan. This will give a rustic, original, and raw look. If you want your room to look subtle, stick to a light brown color, and if you want a dramatic feel, go for darker shade. Brown vinyl plank flooring is an excellent choice as it looks incredible and has various types of themes and décor. Dark Brown Dark brown is another luxury vinyl plank color that is a top choice for many owners. This color makes the room appear cozy and beautiful. Some people might think that dark brown might shrink the space, but this is not the case as long as you have bright-colored walls. The colored floor looks sophisticated and elegant. It gives a dramatic flair to the room as it gives the impression of richness and depth. However, where the dark brown colors increase the room’s visual appeal, they also require special maintenance and care. This is because dark floor colors will likely show scratches, scuffs, dust, and dirt. Black Black is one of the vinyl plank flooring colors, which should be your prime pick if you want a modern and sleek room look. Black LVP colors add the right amount of drama to the room, creating a minimalistic aesthetic effect and making the furniture stand out. It is best to use light tones to contrast with the black floor, as this creates a bold statement. Black vinyl plank flooring also uplifts the mood by creating an expansive feel. The best part about it is that it smoothly blends into the design arrangements without needing to remove the focus from any furniture or articles from the room. White/Cream Out of the various luxury vinyl plank colors, white or cream is a rising color gaining immense popularity. This color in light shades and tones makes the space appear big and bright. White and cream color maintains a clean aesthetic, creating a timeless classic look no matter the room’s size and style. Additionally, white-colored floors can be paired very well with bright and colorful furniture, artwork, throws, bedding, etc. This will not only help you show your personality but also create a subtle, minimal look. Light vinyl plank flooring colors like these are famous in the southern cities of the United States as they give coastal vibes. This is the best alternative to marble or time flooring, which is super expensive. Factors to Consider while Choosing Vinyl Plank Flooring Colors Picking vinyl plank flooring colors is an essential decision because it significantly impacts the overall look of your room. Therefore, it’s important to consider some aspects before picking up LVP colors. Let’s have a look at them. Bottom Line

A vinyl flooring bathroom with black hexagon-shaped tiles.
Blog

Vinyl Flooring Bathroom: Top 7 Brands Offering The Best Tiles

Wondering which floor option for your bathroom would be best? Choose wisely, as the restroom is consistently exposed to water, moisture and detergents. Additionally, your toilet is frequently used,making it necessary for the floor to be durable and strong. Given this, you should pick a flooring that meets all these concerns. The best way out is to go for a vinyl flooring bathroom. Vinyl flooring in the bathroom is a great choice as it is strong and durable against frequent use or heavy foot traffic. It is also stain, water and moisture resistant, making it a great fit for wet areas like the washroom. A vinyl flooring bathroom also gives a beautiful appearance, as vinyl gives the impression of real wood or ceramic. Vinyl flooring in bathrooms is also an affordable option as it gives the feel of luxury flooring like tile,wood and stone flooring at low prices. Additionally, a vinyl flooring bathroom offers underfoot comfort as it is resilient, soft and warm. It is also easy to clean and maintain, saving you a lot of time and effort. However, the main question boils down to which brand is perfect for your vinyl flooring for bathrooms.Fortunately, this blog explores top vinyl flooring brands suitable for restroom flooring. Let’s dive in. What Brands Are Best For Vinyl Flooring Bathroom? It would be best to be careful while choosing bathroom flooring as the floor there is always subjected to rough use. Therefore, you should pick the best vinyl flooring for bathroom. Here are some brands worth trying for your bathroom vinyl flooring. 1.Lifeproof The exclusive Click Lock Waterproof Vinyl Tile Flooring from Lifeproof is a great choice for your bathroom floor as it is designed to offer beauty and durability. This high-performance floor is water,stain, scratch and moisture resistant. Lifeproof has built this rigid core vinyl flooring for not only bathrooms but also basements, kitchens and other living areas for families that have kids, pets or high foot traffic. Lifeproof’s vinyl tile has drop lock installation, which can be done through DIY or with the help of a professional. Its underlayment offers added underfoot comfort. Moreover, the bathroom LVT is coated with an Ultra-Fresh treatment, which prevents mould and mildew growth so that there are no odours or stains. The vinyl tile’s embossed texture gives it a real feel. Perfect for residential and commercial use, this vinyl tile comes with a lifetime warranty. However, it is only suitable for indoor places with temperature-controlled environments. Lifeproof’s Click Lock Waterproof Vinyl Tile Flooring is easy to clean. You just need a vacuum, pH cleaner or a dust mop. The product comes in four exceptional colors. You can purchase it in cases and palates. 2.NewAge NewAge is another great flooring brand when it comes to choosing luxury vinyl bathroom flooring. NewAge’s Click Lock Water Resistant Vinyl Tile Flooring is a great fit for your restroom. This exceptional product offers everything you need for your bathroom floor, ranging from a waterproof core and a 27.6 mil commercial grade wear layer for durability to a stone composite core that can withstand a load of 40,000 lbs and UV resistance. Moreover, NewAge’s luxury vinyl bathroom floor offers an anti-mould IXPE foam backing, eliminating the need for underlayment and offering foot comfort. It also provides acoustic-dampening and anti-fatigue qualities. These tiles are 9.5mm long and are easy to install through an extra strong click-lock system. NewAge’s Click Lock Water Resistant Vinyl Tile brings exceptional aesthetic appeal to your restrooms.These thick tiles have been designed to offer elegance and durability. They are Floor Score certified for safety. They come in three exceptional colors. 3.TrafficMaster Don’t forget TrafficMaster if you want to create a vinyl flooring bathroom, as they come with a top-tier quality collection. Their Peel and Stick Water Resistant Vinyl Tile Flooring is second to none as it comprises several features like: 4.Islander Islander is another flooring brand which offers top-notch vinyl flooring in bathrooms. Their Venice Click Lock Waterproof Vinyl Tile Flooring is matchless as it has a rigid waterproof core, making it durable and resistant against regular water splashes in the bathroom. Islander has designed this high-performance tile that not only is perfect for high-traffic areas but also adds beauty to the bathroom through its color-matched bevel on all sides. The Venice Click Lock Waterproof Vinyl Tile Flooring has an embossed texture, giving the feel of real tile.It doesn’t even have grouting yet and provides an exceptional tile look. Its painted bevels further elevate its aesthetic appeal. The Islander HDPC Rigid Core Vinyl Tile Flooring does not require any acclimation. All you need to do is lay the tile, and it floats over any hard surface like wood, concrete, or more, as it already has an underlayment attached. Its locking system ensures easy and firm installation. Additionally, its cleaning is super easy. Mop it with a damp cloth, and it will be as good as new. This product is great for both residential and commercial use. A great part of Islander’s HDPC Rigid Core Vinyl Tile Flooring is that it diminishes sound transmission and increases comfort due to foam padding. This tile comes in seven colors. Furthermore, the Venice Click Lock Waterproof Vinyl Tile Flooring is considered safe and health friendly for home and commercial environments. It has coveted GREENGUARD Gold certification and is also compliant with EPA (TSCA Title VI). 5.Armstrong Flooring Armstrong is a great pick for vinyl bathroom flooring because it has one of the best waterproof vinyl flooring for bathroom. It has the Universal Black and White Peel and Stick Water Resistant Vinyl Tile Flooring, which has a unique Tacstrong™ adhesive for installation. Its self-adhesive quality makes it perfect for DIY installation. The tile is 100% water resistant and has a durable surface, making it perfect for bathrooms. Armstrong’s Universal Black and White Peel and Stick Water Resistant Vinyl Tile collection is easy to clean and maintain. It gives a modern touch to your bathroom due to its various monochromatic patterns and

Do You Want To Boost Your Business?

drop us a line and keep in touch