How To Stagger Vinyl Plank Flooring? | Simple Steps And Tips

A woman installing the floor after looking up how to stagger vinyl plank flooring.

Share This Post

You pick up your phone to hit Google with “How to stagger vinyl plank flooring?” Wondering how you landed here? Let me guess. You jumped into your overalls, turned on some classical DIY disco music from your all-time favorite rock band, and picked up vinyl planks to lay the flooring.

After placing the final piece, you stood up excited to appreciate your craftsmanship, but to your surprise, the floor didn’t turn out how you expected it to be. The seams are too evenly aligned, which goes hard on the eyes, forcing you to look for the correct vinyl plank layout patterns.

Luckily, we are here to help you. We have written this guide to assist you in staggering vinyl plank flooring. There is no denying that this process can be a little tricky. However, following the proper steps can make it relatively easy.

Let’s get started.

How To Stagger Vinyl Plank Flooring Step By Step?

Here are some effective steps to get a staggered vinyl flooring pattern.

Step 1: Prepare the Room

If you’re wondering how to stagger vinyl plank flooring, the first step is to prepare the room. It is necessary to empty the space by removing all furniture. You should also remove any existing floor and thoroughly clean the subfloor to prep it to lay the perfect staggering floor. Ensure the room is clean, dry, and free from debris.

Step 2: Calculate The Number Of Planks You Need

Get a tape measure to evaluate the width and length of the room where you want to position vinyl planks. To calculate the number of planks needed for the room, divide the room’s width by the width of the planks. This calculation will give you the right size of vinyl planks in the first and last rows.

Remember, they must be the same size for an aesthetic staggering floor pattern. However, the last-row planks might be smaller than the first-row ones. In such a situation, trim the first-row planks to the size of the last ones.

Step 3: Understand What Are H-Joints And Step Patterns

Before you start laying your vinyl plank flooring, it is crucial to understand the “H-Joint” and “Step Pattern,” as they are common mistakes that can mess up the entire floor. The H-Joint occurs when the first-row planks align with the third-row planks. Simply put, vinyl planks end at the same point in every other row, forming an H pattern. Not only does it steal the aesthetics of the floor by creating an unnatural look, but it also depicts that the flooring has not been professionally done.

Moreover, it also increases the risk of planks loosening and disassembling in the future as a weak spot is created due to an H-joint. As a result, you will have to do the job again in the future.

The “step pattern” or “lightning problem” is another mistake many rookies make while installing vinyl plank flooring. This typically happens when the third row repeats the spacing of the first and second rows, creating a regular pattern instead of a random staggered one. This also results in an unattractive appearance.

A simple way to prevent these mistakes while installing a staggered vinyl flooring pattern is to always place the cutoff planks first in every row. This way, the seams will fall randomly as every plank’s size will be different.

Now, you may wonder, what if I run out of cutoff planks after a few rows? Well, we have a secret solution for that as well. All you need to do is observe the first two rows to cut the next row’s first plank. This way, the seams won’t be too close together, giving you flawless staggering vinyl plank flooring.

A man installing a staggering vinyl plank flooring

Step 4: Asses The Number Of Planks You Need

Measure the width and length of the room where you want staggering vinyl flooring with a tape measure. Divide the room’s width by the plank’s width to calculate the floorboards needed to cover the entire floor.

Moreover, remember, if you want a perfect staggered flooring pattern, it is essential to have the right and same size of planks in the first and last rows, which you will get through this calculation. If any row’s planks size turns out to be smaller or bigger than the other one, you could mismanage your entire flooring. For instance, if the last row’s planks size is smaller than the first row, you will have to cut the size of the first-row planks.

Step 5: Know The Spacing Rules

Want to know the main secret behind how to stagger vinyl plank flooring flawlessly? Space the planks correctly. There is no denying that you are nearly halfway there in exceptionally racking vinyl planks by doing this.

Although it depends on the plank’s size, there is typically six inches of space between the end-joint of adjacent rows. The standard vinyl planks are two-three inches wide, making the six-inch spacing rule perfectly applicable, but if the planks are wider, there is no harm in increasing the spacing up to ten inches. However, increasing it to more than that would not be a good idea as this poses a threat to creating an H-joint.

Step 6: Calculate The Right Staggering Space

It is necessary to determine the size of the first and last rows of planks to ensure minimum spacing between the plank’s endpoints. This is important so that you get a natural look at your floor. All you need to do is get a tape measure to determine the room’s length and divide it by the length of a full plank. The optimal stagger spacing is 6 inches. If the number is greater, start the first row by placing a full plank. However, if the number is smaller, start the first row by cutting 1/3 of the plank.

A beautiful staggering floor with minimum spacing

Step 7: Shuffle The Planks

After you remove all the planks from their boxes, shuffle them to ensure you get the perfect staggering flooring. If you fail to do so, you’ll have an even floor with the same colored planks. This will suppress originality and give an unattractive look. Therefore, shuffling the floorboards gives the ideal staggering floor, giving an organic appearance. In addition to that, after unboxing the floorboards, leave them for 48 hours before installation. This process lets planks adjust according to the room’s humidity and temperature. As a result, the planks’ acclimation ensures that their locking system is not compromised and that they are uniformly conditioned.

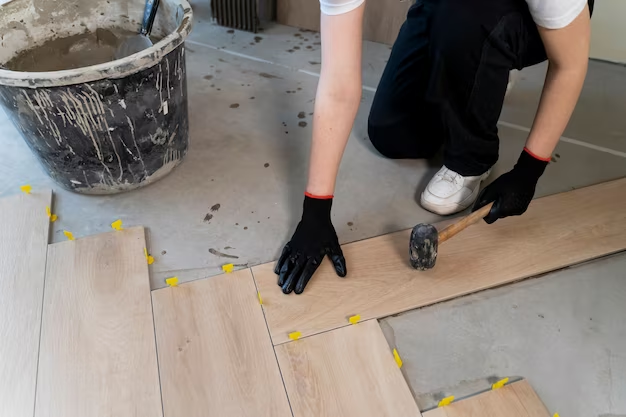
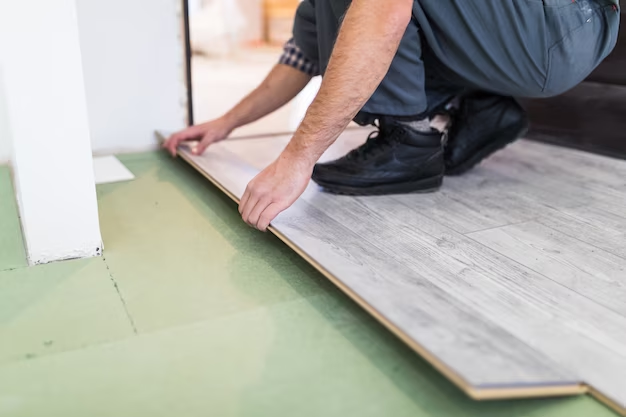
Step 8: Start The Installation Process By Placing The First Board In The First Row

After picking a board, trim its tongue (the small flat edge on the side of the plank). Place the plank in the first row with the tongue side facing the wall and the groove towards the room (the other edge of the plank). Make sure to leave a ¼-inch space between the wall and plank when you install them in the first row.

Moving on, pick the next plank and place its tongue in the first one’s groove. This edge-to-edge plank placing is an effortless, strong-fitting method that ensures strong locking. Similarly, cover the entire row. After placing the first row’s last plank, check if it is under six inches. If so, cut off the first plank to ensure the last one is longer than six inches to give the floor its ultimate structural fitting.

Step 9: Place The Second Row’s Planks

Using the first row’s offcuts, start placing the planks for the second row. Ensure that the first plank of the second row is a minimum of six inches from the closest joint in the first row to get a staggered flooring pattern in the first and second rows. Place the remaining planks in the second row. Cut the row’s last plank accordingly to fit it.

Step 10: Install The Planks In The Third Rows

To install the planks in the third row, never use the offcut, as this will give you a step pattern, blowing off the entire staggering vinyl plank flooring pattern you are trying to achieve. As a result, pick a fresh plank from the stack just like you did in the first row. Cut it into a casual length with a minimum of six-inch spacing from the closest joint. Additionally, avoid creating an H-joint by aligning the last plank with the first row’s last plank, ending at the same point.

Step 11: Continue Installing The Remaining Rows In A Similar Manner

You can use the offcut of the second row to start the fourth row. Further, the offcut of the third row can be used in the fifth row. By the time you’re in the sixth row, pick a fresh plank from the stack and cut it at a random length. The seventh row can be started by using the fourth row’s offcut. Keep doing this process until you cover the entire room with your dream staggering vinyl plank flooring patterns.

Additional Tips On How To Stagger Vinyl Plank Flooring Perfectly

Here are some additional tips to make installing the staggering vinyl plank flooring easy and error-free.

Use A Stagger Template

Consider using a vinyl stagger template if you are new to understanding how to stagger vinyl plank flooring. This tool is made by a piece of flooring cut to a specific size. The stagger template represents the desired stagger distance between the end joints of adjacent rows. The stagger template can be used as a staggering vinyl plank flooring guide to maintain a consistent stagger distance throughout the entire floor, ensuring the planks’ correct positioning.

The stagger template prevents installing long-continuous seams. This not only gives a natural, visually appealing pattern but also enhances the floor’s overall stability. This innovative tool is specifically used when the vinyl planks are of a regular color, texture, or pattern, as the template creates a more random look by breaking the repetition.

Plan The Layout Before Starting

Before starting the installation, plan your staggering vinyl plank flooring layout. This way, you can save time and prevent mistakes during the installation.

Planning a staggering vinyl plank flooring layout is a great idea to prevent mistakes.

Never Use A Dull Knife

Be careful never to use a dull utility knife as it can create spiky edges on the vinyl planks.

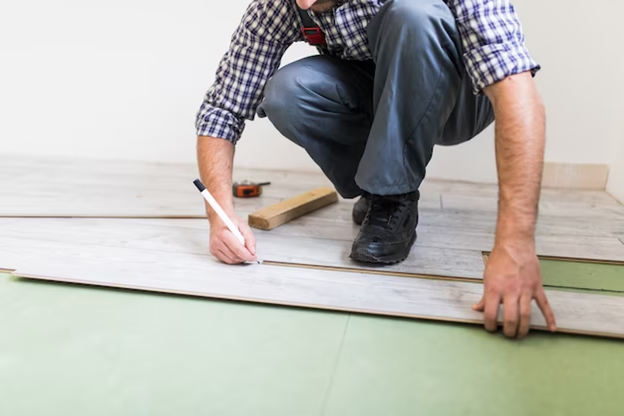
Measure and Cut Precisely

The key to achieving flawless flooring is doing accurate measurements and precise cuts. Always use a tape measure, quality utility knife, and straight edge for clean cuts.

Dry Fit Before Installation

Before installing the vinyl planks, lay them without adhesive and lock them to check how the stagger pattern will look. Not only will this save your time and effort, but it will also prevent the planks from damage due to disassembling and re-installation.

Maintain Minimum Lengths

Don’t use a small cutoff at the end of the rows, as this can result in an untidy installation. Always go for a plank in the last row that is six inches or longer to maintain a cleaner appearance.

Always Go For Random Length

Start the first row with a full-length plank and the second with a random plank. This prevents repetitive vinyl plank flooring patterns, giving a natural staggered look.

Offset Each Row

To achieve a random staggered pattern, offset the planks because aligning the end joints of consecutive rows will create an even straight-line appearance.

Go For Diagonal Installation

If you want a unique and exquisite look, consider laying the vinyl planks diagonally across the room. Although this process may be challenging, it gives a stunning result.

Don’t Forget To Prep The Room’s Walls And Floors

You should not only prepare the floor to install a staggering vinyl plank flooring but also remove other boards from the wall so that there is space between the floating vinyl flooring and the walls. Also, cut the door jambs to make flooring installation easy in all parts of the room.   

Install Underlayment

Installing water and thermal-proof underlayment is great if you install vinyl planks on concrete. This protects the vinyl planks from moisture, increasing their life. For best results, ask your vinyl plank manufacturer or a flooring expert.

Consult Your Manufacturer

Although vinyl flooring is simple and generic for different types of vinyl planks, it is still good to follow the manufacturer’s guidelines and recommendations for your specific staggering vinyl plank flooring.

Done And Dusted

Vinyl is one of the best solutions if you are looking for a firm flooring choice. Staggering, which is the cherry on top. Not only does it increase the stability and life of the flooring, but it also dazzles up the entire look of the place. All you need to do is lay the planks randomly and ensure the least spacing. Having this knowledge solves your “How to stagger vinyl plank flooring” problem for which you picked up your phone in the first place. So what are you waiting for? Get up and get started on laying the perfect vinyl flooring of your dreams. Good Luck!

Subscribe To Our Newsletter

Get updates and learn from the best

More To Explore

A number of vinyl plank flooring colors
Blog

Top 5 Vinyl Plank Flooring Colors to go for

What’s the first thing you notice when you step into a room? We bet it’s the floor. That’s because it’s the first thing our eyes naturally land on. The floor makes a big impression the moment we step into the room, so it’s super important to choose the right wood, carpet, tile, marble, or vinyl plank flooring colors. No matter which material your floor is made of, choosing the appropriate colour is essential as it contributes to the overall style, theme, and mood of the space. A light-colored floor creates an open, airy space, while a dark one evokes warmth and intimacy. Therefore, pick a color according to your room’s setting and preference. In this blog, we will uncover some of the most trending vinyl plank flooring colors, as this is the most common type of flooring. Let’s get started. Trending Vinyl Plank Flooring Colors Several luxury vinyl plank flooring colors are available, and you can choose according to your room or space’s requirements and setting. Let’s look at some of the most popular vinyl plank flooring colors. Grey Grey is one of the most trendy vinyl plank flooring colors, as it gives a natural look to any installed space. This minimalistic tone makes the room appear big and spacious as it goes easy on the eyes. This neutral color is a perfect choice for floors as they are more versatile and enable the walls to carry the room’s weight. Grey vinyl flooring is a sophisticated and stylish option, giving a modern and aesthetic touch to your homes and commercial properties. This shade also works well with various interior designs, as grey is no less than a blank slate for decorating. Grey comes under a dull tone, making other bright colors in the room pop very well.  Moreover, grey vinyl flooring is great for hiding dirt, dust and pet hair. This natural achromatic color is also good at hiding scratches and scrapes, which is why this flooring is a good option if you have heavy furniture or like making frequent décor changes. Grey is one of the vinyl plank flooring colors, which is an appropriate option for rental houses. Those properties are roughly used, and different people move in them where they set the space according to their unique preferences. Additionally, it’s a good idea to always go for natural colors as this increases the house’s value, which can then be resold at any time. Brown Brown-colored vinyl flooring is the most common option across various houses, shops, and properties. Most shades and tones of vinyl planks are usually available in this color. From strong mahogany tones to pale tans, brown vinyl plank flooring comes in various shades, which you can choose according to your setting. Brown vinyl plank flooring comes in several patterns, which makes it easy to pick a type that compliments the existing room furniture and décor. Brown comes under the prime vinyl plank flooring colors, which offers amazing versatility as its tones offer depth and richness without looking heavy or extra. This flooring color looks natural as it resembles hardwood, which gives a cozy and warm feeling. Moreover, brown vinyl flooring is available in various patterns like embossing, zigzag, geometric shapes, knots, cracks, and grain variations. The best colors for your residential or commercial spaces are those that depict a natural tone, like sand or tan. This will give a rustic, original, and raw look. If you want your room to look subtle, stick to a light brown color, and if you want a dramatic feel, go for darker shade. Brown vinyl plank flooring is an excellent choice as it looks incredible and has various types of themes and décor. Dark Brown Dark brown is another luxury vinyl plank color that is a top choice for many owners. This color makes the room appear cozy and beautiful. Some people might think that dark brown might shrink the space, but this is not the case as long as you have bright-colored walls. The colored floor looks sophisticated and elegant. It gives a dramatic flair to the room as it gives the impression of richness and depth. However, where the dark brown colors increase the room’s visual appeal, they also require special maintenance and care. This is because dark floor colors will likely show scratches, scuffs, dust, and dirt. Black Black is one of the vinyl plank flooring colors, which should be your prime pick if you want a modern and sleek room look. Black LVP colors add the right amount of drama to the room, creating a minimalistic aesthetic effect and making the furniture stand out. It is best to use light tones to contrast with the black floor, as this creates a bold statement. Black vinyl plank flooring also uplifts the mood by creating an expansive feel. The best part about it is that it smoothly blends into the design arrangements without needing to remove the focus from any furniture or articles from the room. White/Cream Out of the various luxury vinyl plank colors, white or cream is a rising color gaining immense popularity. This color in light shades and tones makes the space appear big and bright. White and cream color maintains a clean aesthetic, creating a timeless classic look no matter the room’s size and style. Additionally, white-colored floors can be paired very well with bright and colorful furniture, artwork, throws, bedding, etc. This will not only help you show your personality but also create a subtle, minimal look. Light vinyl plank flooring colors like these are famous in the southern cities of the United States as they give coastal vibes. This is the best alternative to marble or time flooring, which is super expensive. Factors to Consider while Choosing Vinyl Plank Flooring Colors Picking vinyl plank flooring colors is an essential decision because it significantly impacts the overall look of your room. Therefore, it’s important to consider some aspects before picking up LVP colors. Let’s have a look at them. Bottom Line

A vinyl flooring bathroom with black hexagon-shaped tiles.
Blog

Vinyl Flooring Bathroom: Top 7 Brands Offering The Best Tiles

Wondering which floor option for your bathroom would be best? Choose wisely, as the restroom is consistently exposed to water, moisture and detergents. Additionally, your toilet is frequently used,making it necessary for the floor to be durable and strong. Given this, you should pick a flooring that meets all these concerns. The best way out is to go for a vinyl flooring bathroom. Vinyl flooring in the bathroom is a great choice as it is strong and durable against frequent use or heavy foot traffic. It is also stain, water and moisture resistant, making it a great fit for wet areas like the washroom. A vinyl flooring bathroom also gives a beautiful appearance, as vinyl gives the impression of real wood or ceramic. Vinyl flooring in bathrooms is also an affordable option as it gives the feel of luxury flooring like tile,wood and stone flooring at low prices. Additionally, a vinyl flooring bathroom offers underfoot comfort as it is resilient, soft and warm. It is also easy to clean and maintain, saving you a lot of time and effort. However, the main question boils down to which brand is perfect for your vinyl flooring for bathrooms.Fortunately, this blog explores top vinyl flooring brands suitable for restroom flooring. Let’s dive in. What Brands Are Best For Vinyl Flooring Bathroom? It would be best to be careful while choosing bathroom flooring as the floor there is always subjected to rough use. Therefore, you should pick the best vinyl flooring for bathroom. Here are some brands worth trying for your bathroom vinyl flooring. 1.Lifeproof The exclusive Click Lock Waterproof Vinyl Tile Flooring from Lifeproof is a great choice for your bathroom floor as it is designed to offer beauty and durability. This high-performance floor is water,stain, scratch and moisture resistant. Lifeproof has built this rigid core vinyl flooring for not only bathrooms but also basements, kitchens and other living areas for families that have kids, pets or high foot traffic. Lifeproof’s vinyl tile has drop lock installation, which can be done through DIY or with the help of a professional. Its underlayment offers added underfoot comfort. Moreover, the bathroom LVT is coated with an Ultra-Fresh treatment, which prevents mould and mildew growth so that there are no odours or stains. The vinyl tile’s embossed texture gives it a real feel. Perfect for residential and commercial use, this vinyl tile comes with a lifetime warranty. However, it is only suitable for indoor places with temperature-controlled environments. Lifeproof’s Click Lock Waterproof Vinyl Tile Flooring is easy to clean. You just need a vacuum, pH cleaner or a dust mop. The product comes in four exceptional colors. You can purchase it in cases and palates. 2.NewAge NewAge is another great flooring brand when it comes to choosing luxury vinyl bathroom flooring. NewAge’s Click Lock Water Resistant Vinyl Tile Flooring is a great fit for your restroom. This exceptional product offers everything you need for your bathroom floor, ranging from a waterproof core and a 27.6 mil commercial grade wear layer for durability to a stone composite core that can withstand a load of 40,000 lbs and UV resistance. Moreover, NewAge’s luxury vinyl bathroom floor offers an anti-mould IXPE foam backing, eliminating the need for underlayment and offering foot comfort. It also provides acoustic-dampening and anti-fatigue qualities. These tiles are 9.5mm long and are easy to install through an extra strong click-lock system. NewAge’s Click Lock Water Resistant Vinyl Tile brings exceptional aesthetic appeal to your restrooms.These thick tiles have been designed to offer elegance and durability. They are Floor Score certified for safety. They come in three exceptional colors. 3.TrafficMaster Don’t forget TrafficMaster if you want to create a vinyl flooring bathroom, as they come with a top-tier quality collection. Their Peel and Stick Water Resistant Vinyl Tile Flooring is second to none as it comprises several features like: 4.Islander Islander is another flooring brand which offers top-notch vinyl flooring in bathrooms. Their Venice Click Lock Waterproof Vinyl Tile Flooring is matchless as it has a rigid waterproof core, making it durable and resistant against regular water splashes in the bathroom. Islander has designed this high-performance tile that not only is perfect for high-traffic areas but also adds beauty to the bathroom through its color-matched bevel on all sides. The Venice Click Lock Waterproof Vinyl Tile Flooring has an embossed texture, giving the feel of real tile.It doesn’t even have grouting yet and provides an exceptional tile look. Its painted bevels further elevate its aesthetic appeal. The Islander HDPC Rigid Core Vinyl Tile Flooring does not require any acclimation. All you need to do is lay the tile, and it floats over any hard surface like wood, concrete, or more, as it already has an underlayment attached. Its locking system ensures easy and firm installation. Additionally, its cleaning is super easy. Mop it with a damp cloth, and it will be as good as new. This product is great for both residential and commercial use. A great part of Islander’s HDPC Rigid Core Vinyl Tile Flooring is that it diminishes sound transmission and increases comfort due to foam padding. This tile comes in seven colors. Furthermore, the Venice Click Lock Waterproof Vinyl Tile Flooring is considered safe and health friendly for home and commercial environments. It has coveted GREENGUARD Gold certification and is also compliant with EPA (TSCA Title VI). 5.Armstrong Flooring Armstrong is a great pick for vinyl bathroom flooring because it has one of the best waterproof vinyl flooring for bathroom. It has the Universal Black and White Peel and Stick Water Resistant Vinyl Tile Flooring, which has a unique Tacstrong™ adhesive for installation. Its self-adhesive quality makes it perfect for DIY installation. The tile is 100% water resistant and has a durable surface, making it perfect for bathrooms. Armstrong’s Universal Black and White Peel and Stick Water Resistant Vinyl Tile collection is easy to clean and maintain. It gives a modern touch to your bathroom due to its various monochromatic patterns and

Do You Want To Boost Your Business?

drop us a line and keep in touch